Import image sequence
This workflow demonstrates how to import a series of image files into a single ND2 file.
All image files should be organized in a single folder with .nd2, .tif, .tiff, .btf, .lsm, .czi, .oif, .oib, .png, or .jpg/.jpeg extensions. Below is an example of a well-organized folder with TIFF files:
tiff_z1_xy1_c1.tif
tiff_z1_xy1_c2.tif
tiff_z1_xy1_c3.tif
tiff_z1_xy2_c1.tif
tiff_z1_xy2_c2.tif
tiff_z1_xy2_c3.tif
tiff_z2_xy1_c1.tif
tiff_z2_xy1_c2.tif
tiff_z2_xy1_c3.tif
In this example, z1, z2, … are Z-slices, xy1, xy2, … are XY positions (multipoints), and c1, c2, c3 are channels.
Important:
- Filenames must be consistent and clearly indicate dimensions
- The sequence should be complete
- Sequences with missing dimension combinations can still be converted by enabling
Missing files replaced with blackin Advanced settings
Basic sequence import
Step 1: File and dimension selection
- Open the conversion dialog from any page by clicking the
arrow on the Image button and selecting
Import image sequence.... - You’ll be prompted to select the first file from the sequence. Once selected, the following dialog will appear.
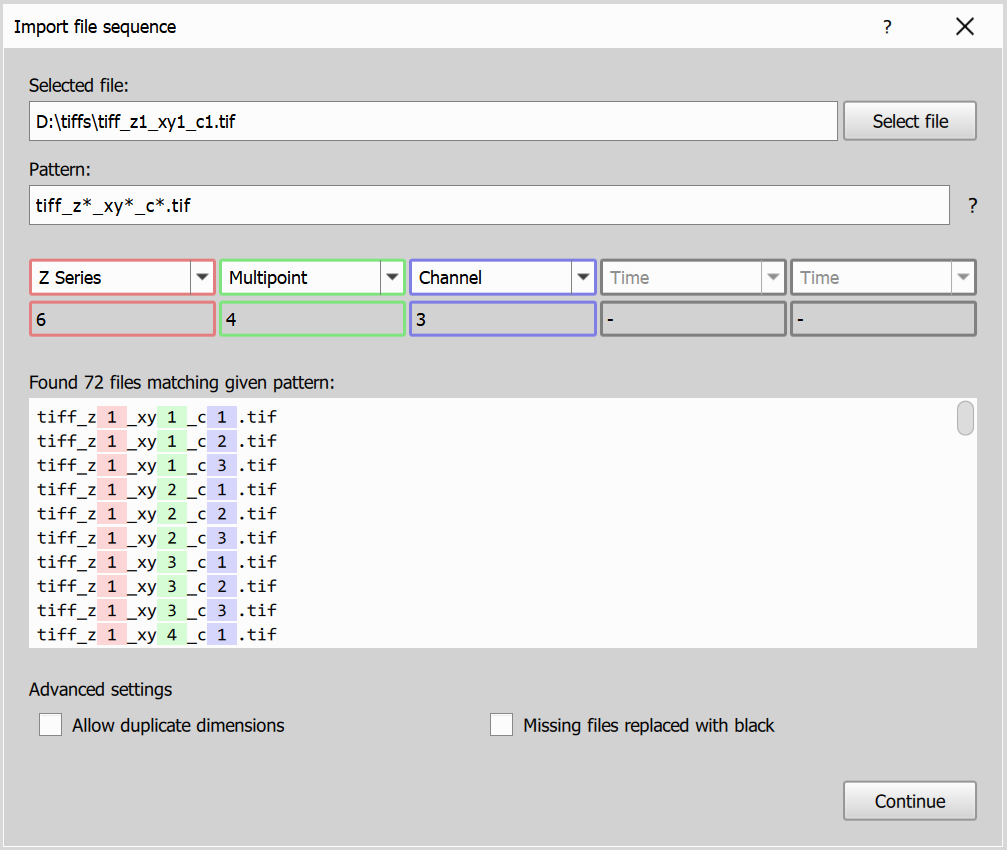
Dialog consists of the following elements:
- Selected file: Displays the currently selected file from the sequence, you can also select a different image file.
- Pattern matching: Uses simplified glob pattern matching to extract dimensions from filenames. You can manually adjust the pattern if the auto-detection is not accurate.
- Found files highlighting: Shows all files matching the current pattern, with detected dimension parts highlighted in the file list/status so you can verify the match.
- Dimensions dropdown: Allows you to match found dimensions to the appropriate dimension type (Time, Z Series, Multipoint, Channel). Below the dropdown you can also see size of each dimension.
- Matched files list: Displays all files matching the pattern, with detected dimensions highlighted to help confirm the correctness of the selection.
- Advanced settings:
Allow duplicate dimensionslets you assign the same dimension type more than once (for example two channel dimensions), andMissing files replaced with blackallows conversion to continue when some dimension combinations are missing by filling them with black data.
Step 2: Experiment and microscope settings
On this page you will input the experiment and microscope settings for the imported image.
If available, the dialog pre-fills settings from image metadata; otherwise it uses the last saved settings for the current filename pattern.

- Experiment Settings: Based on the selected dimensions, you’ll be prompted to provide relevant settings for the experiment. For the Time dimension, enter the time interval between frames. For the Z Series, specify the Z-step size. If a Channel dimension is selected, you’ll need to input details for each channel, including names, modalities, excitation and emission wavelengths, and the channel color.
- Microscope Settings: Specify the microscope settings for the imported image.
- Prefill buttons:
Insert from imageloads settings parsed from the image file, andInsert from last conversionloads settings previously saved for the current pattern.
Once all settings are entered, click the Convert button and select path for the converted ND2 file to start the conversion process.
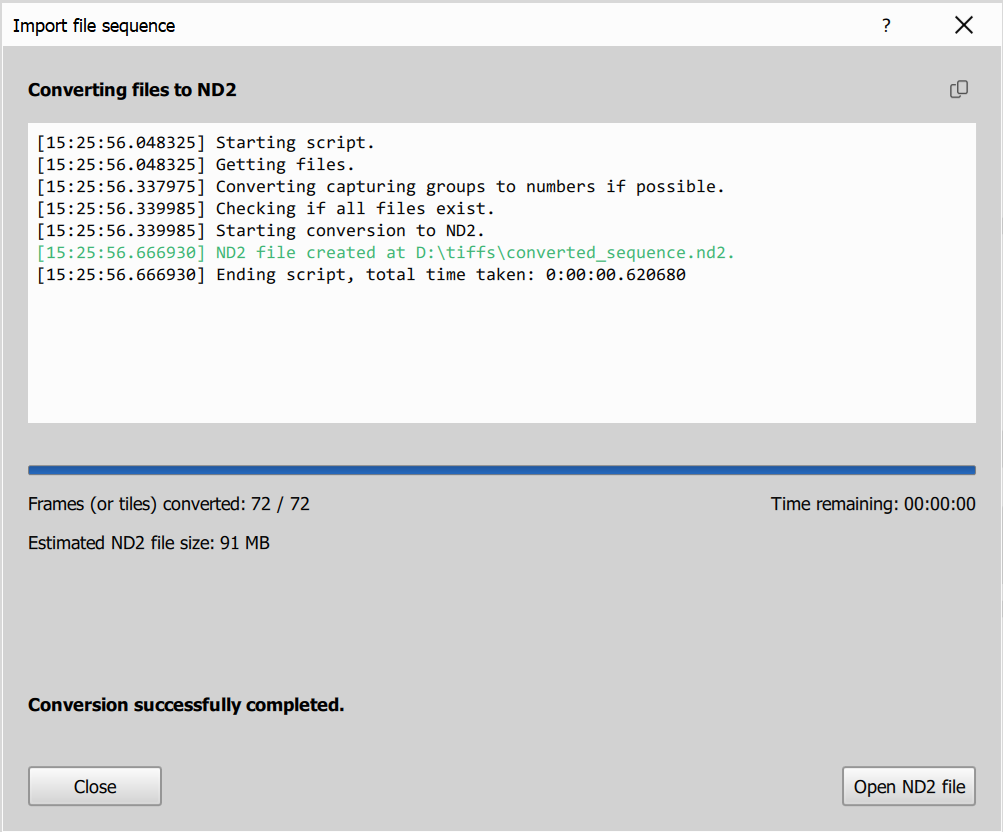
Step 3: Conversion
On this page you will see the progress of the conversion process, estimated remaining time and output filesize. Once the conversion is complete, you can open the converted ND2 file in NIS Express.
Advanced sequence import
Example 1: OME-TIFF with fixed Time/Channel and two filename Multipoint dimensions
This example combines dimensions stored in the file metadata with dimensions parsed from the filename.
- In this example, the input folder contains OME-TIFF files where each file already has Time and Channel dimensions, and the filename contains two additional dimensions.
- Keep or adjust the pattern so the two filename groups are parsed from
XY01_01. - On page 1, Time and Channel should be fixed from file metadata, and two additional dimensions from filename should be available.
- Set both filename dimensions to Multipoint.
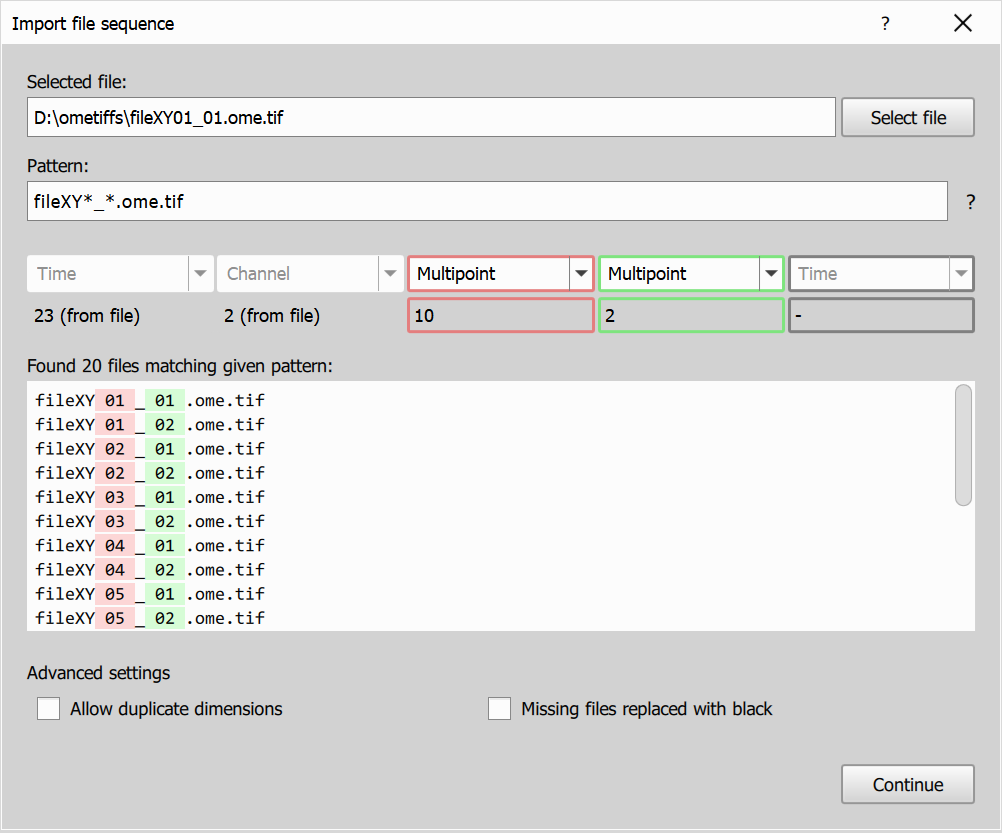 Resulting image dimensions: 23T, 2CH, 20M.
Example 2: Merge in-file channels with a filename channel dimension (spectral import use case)
In this example, each file already contains Z and Channel dimensions (for example 3 in-file channels), and the filename adds another Channel dimension (for example 5 values in filename). This is useful for importing spectral data split across in-file channel metadata and filename-based channel groups.
- Enable Advanced settings ->
Allow duplicate dimensions. - Keep Z Series and one Channel dimension fixed from file metadata.
- Set the filename-derived dimension to Channel as well.
- The resulting channel set combines both channel dimensions (for example
3 x 5 = 15channels).
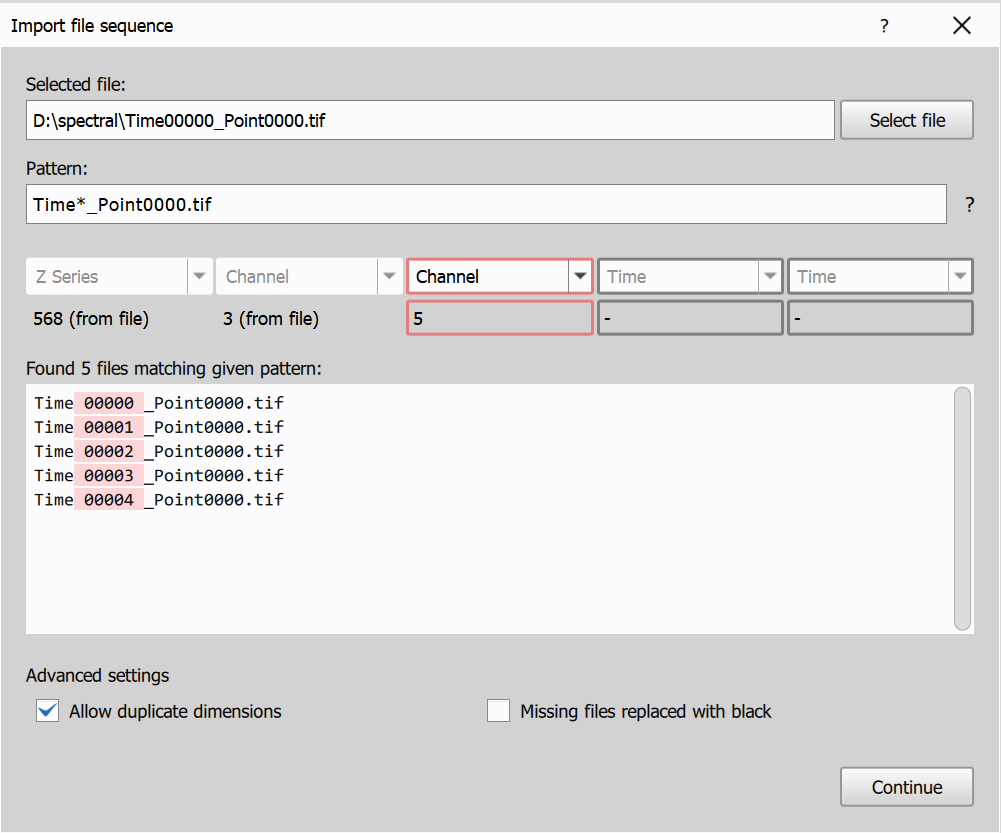 Resulting image dimensions: 568Z, 15CH (from
 3 x 5 channels).