NIS.ai
Preprocessing
Restore.ai vs Clarify.ai vs Deconvolution
Use Restore.ai when the goal is high-quality AI restoration of fluorescence images and the data has combined degradation: noise, out-of-focus blur, or low-quality optical detail. It is more complex and generally slower than Clarify.ai, but can recover more sample detail.
Use Clarify.ai when the main problem is widefield out-of-focus blur and the user wants a fast AI removal step. Clarify.ai does not denoise by itself, does not increase resolution, and is best for thick or under-sampled widefield data.
Use Deconvolution when the data is well-sampled fluorescence microscopy and the goal is mathematically modeled optical restoration with explicit deconvolution behavior. Prefer it when quantitative rigor, method choice, PSF/model control, or per-channel deconvolution tuning matters.
Do not use Restore.ai as a generic denoising substitute; use Denoise.ai or ND Denoise.ai for noise-only problems. Do not use Restore.ai for brightfield-only workflows. If strict quantitative deconvolution is required, prefer Deconvolution; if fast widefield out-of-focus blur cleanup is enough, prefer Clarify.ai.
Clarify.ai
This function removes out of focus blur from the source images using neural networks. It is intended for widefield images and works best for thick samples. It is a preferred choice for under-sampled images, whereas deconvolution is a preferred method for well-sampled images.
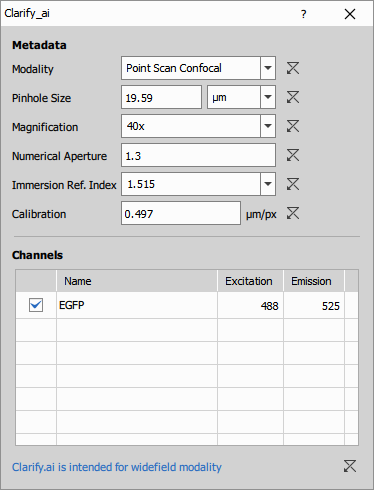
Clarify.ai requires valid image metadata (similar to deconvolution). It is a parameterless method which does not increase the resolution and does not denoise the image however it can be combined with Denoise.ai. Check the Denoise.ai check box next to a channel to perform denoising first before clarifying. Check this check box only for very noisy images with SNR value smaller than 20.
- Modality To handle the out-of-focus planes correctly, it is important to know how exactly the image sequence has been acquired. Select the proper microscopic modality from the combo box.
- Pinhole size Depending on the
Modalitysetting, set the pinhole/slit size value and choose the proper units. - Magnification of the objective used to capture the image sequence.
- Numerical Aperture of the objective.
- Immersion Refractive Index of the medium used.
- Calibration in μm/px.
- Channels selects which channels will be clarified and which will be denoised. You can also adjust the emission wavelength.
Parameters
See also: Preprocessing (group)
Restore.ai
It restores fluorescence images by combining denoising, deconvolution-style restoration, and out-of-focus blur removal.
Use Restore.ai when the image needs more than simple out-of-focus blur removal or simple denoising, especially when the prompt asks for AI restoration or when fluorescence images are degraded by both noise and optical blur.
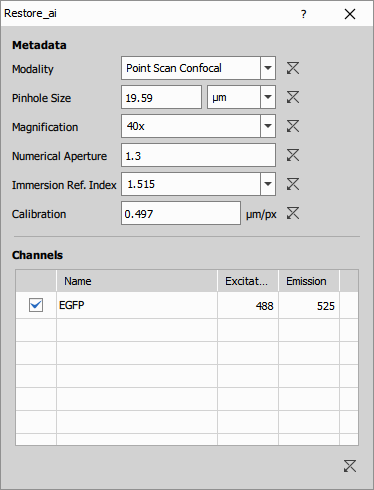
- Modality To handle the out-of-focus planes correctly, it is important to know how exactly the image sequence has been acquired. Select the proper microscopic modality from the combo box.
- Magnification of the objective used to capture the image sequence.
- Numerical Aperture of the objective.
- Refractive Index of the immersion medium used. Some predefined refractive indices of different media are available in the nearby pull-down menu.
- Calibration in μm/px.
- Channels produced by camera are listed within this table. You can decide which channel(s) shall be processed by checking the check boxes next to the channel names. The emission wavelength value may be edited (except the Live De-Blur method).
See also: Preprocessing (group)
Denoise.ai
Denoise.ai is a deep learning-based denoising algorithm. It uses a convolutional neural network trained on thousands of confocal images (resonant and galvano) and widefield images to remove shot noise - a dominant noise component in low-light microscopy, while preserving signal intensity and structure. The algorithm operates in real time on GPU(s), supporting both live and post-acquisition processing. Denoise.ai improves image quality without increasing exposure or averaging, enabling faster acquisition and lower illumination power. It requires spatially uncorrelated noise and is not compatible with sensors like the Nikon Qi2. Denoise.ai can be used on a timelapse or on a single frame. This function is used especially for static scenes because moving objects may get blurred.
For more information please see Nikon NIS-Elements Denoise.ai Software: utilizing deep learning to denoise confocal data.
See also: Preprocessing (group)
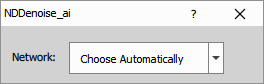
ND Denoise.ai
ND Denoise.ai is an AI denoising method for NIS-Elements ND datasets that improves image quality by analyzing information across neighboring planes or time points rather than treating each image independently. It is designed for multi-dimensional fluorescence data where adjacent images contain correlated biological structure, including time-lapse acquisitions and Z-stacks. ND Denoise.ai is especially useful for low-light live-cell imaging, fast biological events, long-duration experiments, dim or sparse fluorescent labels, calcium or voltage imaging, organelle dynamics, multiplex live imaging, and Z-stacks acquired with reduced excitation light.
For best results, use it on datasets with enough neighboring frames or planes to provide context and with signal that changes smoothly between adjacent images. Use the original Denoise.ai instead for single images or for datasets where each image already has adequate SNR and temporal or spatial context is not needed. For extremely rapid, discontinuous events or data with abrupt changes between neighboring images, compare results carefully and consider standard Denoise.ai as an alternative. As with any denoising method, use care when applying denoised images to quantitative analyses that depend on absolute intensity values.
See also: Preprocessing (group)
Transformations
Enhance.ai
Enhance.ai applies a trained NIS.ai image-to-image network to the selected input channel or channels and produces enhanced picture output channels. The network is trained from paired examples, typically a lower-quality acquisition and a matching higher-quality target, so it learns to transform the input image toward the target image quality.
Use Enhance.ai when you want to improve image quality before visual review, segmentation, measurement, or saving, especially when the trained network was built for the same sample type, modality, and acquisition conditions. Typical use cases include processing images acquired with lower exposure or illumination so that analysis can be performed while reducing phototoxicity, photobleaching, or acquisition burden.
.eai for 2D data or .eai3d for 3D data. It outputs Picture channels, not Binary objects.- Trained AI Selects the trained network from a file (click Browse to locate the *.eai file).
- Details… Opens metadata associated with training of the currently selected neural network.

Parameters
See also: Guide on Ai Page
Convert.ai
Convert.ai applies a trained NIS.ai image-to-image network that converts one imaging modality into another. The network is trained from paired source and target images, for example transmitted-light input paired with fluorescence target images, and then generates converted picture output channels from the source image.
Use Convert.ai when the analysis workflow needs a channel that was not acquired directly, or when a trained model can provide a useful synthetic representation for downstream segmentation, measurement, display, or saving. A common use case is generating fluorescence-like signal from brightfield or DIC images when the model was trained on matching transmitted-light and fluorescence data.
.cai for 2D data or .cai3d for 3D data. It outputs Picture channels, not Binary objects, so any object masks still need downstream segmentation.- Trained AI Selects the trained network from a file (click Browse to locate the *.cai file).
- Details… Opens metadata associated with training of the currently selected neural network.

Parameters
See also: Guide on Ai Page
Segmentation
Cells Localization.ai
Cells Localization.ai runs a built-in NIS.ai cell-localization network on a brightfield input image and produces a Binary marker layer at detected cell centers.
Use Cells Localization.ai when you need fast cell-center detection in brightfield data, especially for counting cells, showing approximate cell positions, creating marker overlays, or driving workflows that only need cell presence/location rather than complete segmentation masks.
It is intended for brightfield images close to focus (about +/- 25 um). It has no user controls and does not require selecting a user-trained AI file. For full cell masks or object identities, use Segment.ai, Segment Objects.ai, Cellpose, thresholding, or another segmentation workflow instead.
Segment.ai
Segment.ai applies a trained NIS.ai semantic-segmentation network to the selected input channel or channels and produces Binary segmentation output. It identifies trained regions or classes in the image, such as tissue areas, wound regions, well areas, or other structures where the goal is to mark pixels/voxels belonging to a learned category.
Use Segment.ai when other segmentation methods fail.
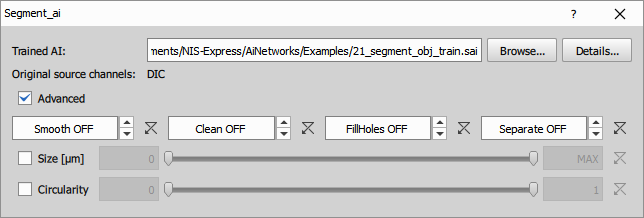
The node can optionally apply post-processing such as smoothing, cleaning, hole filling, object separation, and 2D size/circularity restrictions.
.sai for 2D data or .sai3d for 3D data.- Trained AI Selects the trained network from a file (click Browse to locate the *.sai file).
- Details… Opens metadata associated with training of the currently selected neural network.
- Advanced Reveals post-processing tools and restrictions used for enhancing the results of the neural network.
Parameters
See also: Guide on Ai Page
Segment Objects.ai
Segment Objects.ai applies a trained NIS.ai instance-segmentation network to the selected input channel or channels and produces a Binary object layer where individual detected objects are separated. It is intended for object-level segmentation, for example nuclei, cells, embryos, or similar compact objects where each object should become a separate measurable entity.
It is the better choice than Segment.ai when touching or nearby objects must be separated as individual objects rather than treated as one semantic region.
The composed node can optionally apply object smoothing, cleaning, hole filling, and 2D size/circularity restrictions.
The node has pre-trained networks intended for nuclei like round-shaped objects.
Fo other object shapes Segment Objects.ai requires a compatible trained AI file: .oai for 2D data or .oai3d for 3D data.
- Trained AI Selects the trained network from a file (click Browse to locate the *.oai file).
- Details… Opens metadata associated with training of the currently selected neural network.
- Advanced Reveals post-processing tools and restrictions used for enhancing the results of the neural network.
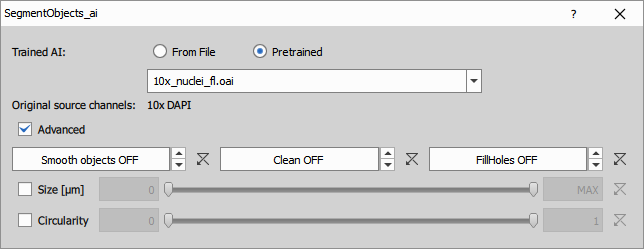
Parameters
See also: Guide on Ai Page
Trained files
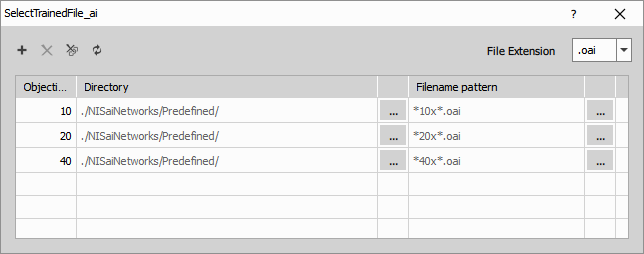
Select Trained File ai
Selects an appropriate trained AI file according to the sample objective magnification. Output is expected to be used as a dynamic input parameter for another AI node. Paths to the trained AI files, either relative or absolute, can be defined using a standard regular expression.
Measurement
Cells Presence.ai
Detects whether cells are present in the brightfield image or not. Works even for out of focus images.
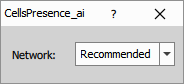
- Network Selects the trained network used for the cells presence detection.
- The Recommended option should be used in most cases, as it is trained on a larger dataset and generally delivers better results. However, in rare situations, you can switch to the Legacy network if necessary.
Node outputs:
- Verdict is 1 if cells are present, 0 if they are not present.
- Confidence of the detection, ranging from 0 (not confident) to 1 (very confident).
Quality Estimate.ai
Estimates the Signal to Noise Ratio (“SNR”) value.
Evaluation
Segmentation Accuracy
Calculates the average precision to evaluate AI performance on objects. This node has two inputs - GT (Ground Truth) and Pred (Prediction). It compares the ground truth binary layer (A) and predicted binary layer (B) generated by segmentation using AI.
This node calculates the given metrics directly on pixel data without considering any objects. The metrics it computes (TP, FP, FN) are expressed as the number of pixels, not the number of objects. The IoU threshold is not used in this node.
- true positives (TP) matched correctly,
- false positives (FP) incorrectly segmented objects and
- false negatives (FN) incorrectly missed objects.
Based on these numbers it calculates:
- precision = TP / (TP + FP),
- recall = TP / (TP + FN) and
- F1 = 2 x precision x recall / (precision + recall)
Object Segmentation Accuracy
Calculates the average precision to evaluate AI performance on objects. This node has two inputs - GT (Ground Truth) and Pred (Prediction). It compares the ground truth binary layer (A) and predicted binary layer (B) generated by segmentation using AI.
This node calculates the given metrics directly on objects. The metrics it computes (TP, FP, FN) are expressed as the number of objects.
- true positives (TP) matched correctly,
- false positives (FP) incorrectly segmented objects and
- false negatives (FN) incorrectly missed objects.
Based on these numbers it calculates:
- precision = TP / (TP + FP),
- recall = TP / (TP + FN) and
- F1 = 2 x precision x recall / (precision + recall)
IoU Threshold Defines a threshold above which two overlapping objects are considered correctly matched - threshold of quantity:
