Main window
The main window is shared among all three pages.
It can visualize:
The main window can display images and results coming from the same origin side-by-side in a dedicated Compare mode.
Image

- Toolbar
- houses the major viewing modes, information overlays, zooming controls and menu More actions.
- Image area
- displays the image (with overlaid or split channels) or the volume. Both can show binary layers.
- Statusbar
- displays channels selection, information about the calibration, bit-depth and image size in pixels. If there are binary layers in the image it also has the buttons to show each of them and a settings dialog.
- ND navigation
- navigation bars are shown depending on the image dimensionality. Every dimension has ticks to move to an absolute position directly and navigation buttons for relative moves as well as the play button with options.
Split channels
 with cells")
Volume view

LUTs
There are two LUTs controls Simple and Complex (can be changed in the settings) using different sliders to achieve the same result.

The resulting RGB pixel intensity is calculated from all channel intensities () transformed by the LUTs and mapped to their respective color () as follows:
The Gain slider () is logarithmic and is the major control of brightness. The Offset () controls the blacks and Gamma ()the contrast.

The resulting RGB pixel intensity is calculated from all channel intensities () transformed by the LUTs and mapped to their respective color () as follows:
The Lo an Hi bounds define the Range that is mapped to minimum (0) and maximum (255) brightness and Gamma ()the contrast.
The sliders and histogram range can be zoomed to the actual data range using the button at the low-right of the window.
The Low and High percentiles are used when calculating auto-contrast in such a way that only the specified percent of pixels is under- or over- saturated. The Low and High is set separately for brightfield (BF) and fluorescence (Fluo).
Furthermore, when brightfield is mixed with fluorescence there is slider for Brightfield opacity.
The match intensity slider is for compare mode to bring the intensities of compared images more to look alike.
Image info

Binary layers
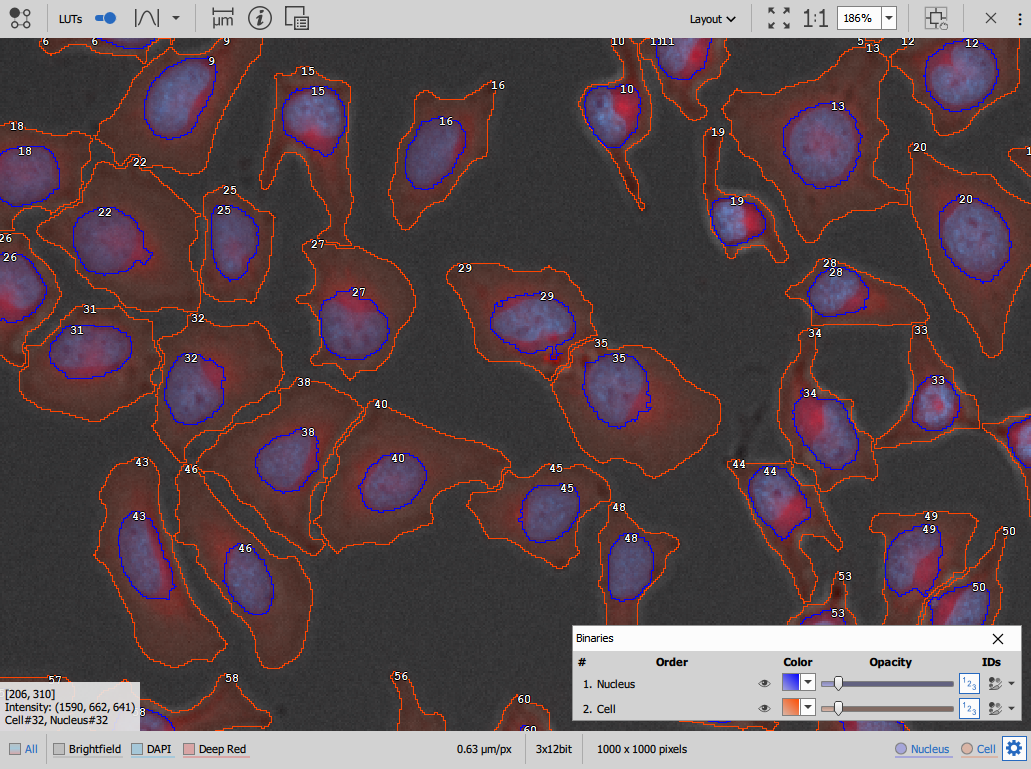
Individual Layers (here Nucleus and Cell) can be switched on/off directly from the statusbar.
In the Binaries display settings
it is further possible to:
- change the layer position in the stack (drag it up or down by its name),
- show/hide each layer,
- override the color of each layer,
- change the opacity of each layer independently,
- show/hide object ID numbers in the image and
- colorize object by ID
Results
Recipes can create results (tables, graphs, …) with different level of complexity.

The results can be organized into four layouts:
- image with complex results where the window is divided into four quadrants,
- image with simple results where the results are below the image,
- image with simple results (vertical) where the results are left of the image or
- just the image where the results are hidden.
There is also an automatic option which chooses the layout to show all results.

")

Compare mode
Images coming from the same original with or without results are opened together.
Open first images and from the
More actions button
open either Open all related results or select few specific ones
one-by-one from Open related results dropdown.

Use the Compare view button to toggle a display where the images are
- one over the other and
- side-by-side
Multiple images side-by-side
In compare view these are synchronized:
- the viewport of all images is synchronized to show the same portion of the image,
- the channel selection is equal (where possible),
- ND2 control is synchronized (where possible),
- the LUTs settings are synchronized and
- deconvolution info and scale bar are shown on all images.


Multiple results side-by-side
